
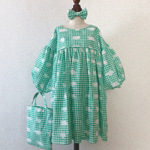
This bag is designed to look like a Kimono’s front. By gathering the material, you can make a round-formed bag to accommodate a lot of your stuff. It will be your own special bag with your favorite Tyrolean trim, lace, or ribbon. The tip to make it more three-dimensional is to gather the fabric at each side and then seam them at the bottom part.
• Fabric 110cm(W) x 100cm(L)
• Interfacing 100cm(W) x 65cm(L)
• Double-folded bias tape 11mm(W) x 100cm(L)
• Tyrolean Trim 1.7cm(W) x 360cm(L)
Fabric shown for this sample :
KOKKA nunokawa (Frog) f-102 d/#2

INSTRUCTIONS
• After cutting fabric, iron on the interfacing to each right side yoke, wrong side yoke, and binding strips (A).
• Face right sides of binding strips (A) with each other, place binding stripes lengthwise and seam together.
Step 1. Sewing the bag’s body and yokes
• Sew running stitches 0.5cm from the edge and pull carefully the thread to gather.
• Sandwich the main panel between the right side yoke and wrong side yoke, and then sew with a machine.
• Flip over both yokes then press flat. Sew stitches 0.2cm seam on the right side yoke.
Step 2. Binding
• Fold each binding strip in half to mark the center, and fold outer edges in to meet the center crease.
• Face the binding strip (B) and right side yoke with each other, and then sew with a machine.
• Flip over the binding strip (B). Place the Tyrolean trim in the center of the binding strip. Apply with edge-stitches with a machine.
• Sew the binding strip (A) on the main panels in the same ways as shown in the diagram.
Step 3. Overlapping the front edges
• Overlap the front edges. Sew with a machine to the meet the end point along the bottom of the bag.
Step 4. Gathering
• Sew running stitch between gathering end points, and then pull the threads to gather to 45cm.
Step 5. Sewing around the bag’s body
• Turn out the bag’s body. With right sides together, sew stitches 1cm seam along the body.
Step 6. Bias binding
• Bind the seam allowance with bias tape.
Step 7. Finishing

 Handmade Kids Clothing – Fluffy Bunny Dress – Sewing Instructions
 Gathered Skirt with Yoke
 Cache Coeur Wraparound Dress